
Wendy’s idea for this specially commissioned sculpture emerged from the intimate ambiance of the theatre, where individuals gather in dim light, surrounded by strangers, each with their own identities, their own genetic make-up. This sculpture embodies the profound experience of shared presence, where differences, whether visible or invisible, dissolve into the collective embrace of the moment – the connection, the being, overrides all.
Wendy explains “At the outset of this project for Oxford University, I experienced the unfortunate event of fracturing my ankle, which led to spending the summer in a wheelchair. This challenging situation opened my eyes to a different perspective, allowing me to understand the difficulties faced by others who have limited mobility and cannot easily view objects of interest. It turned out to be a fortunate accident, aligning this perfectly with the essence and intentions of my project, creating a more accessible visual experience for all – the initial height for the lowest plinth being the same as my eye height whilst seated in a wheelchair”.
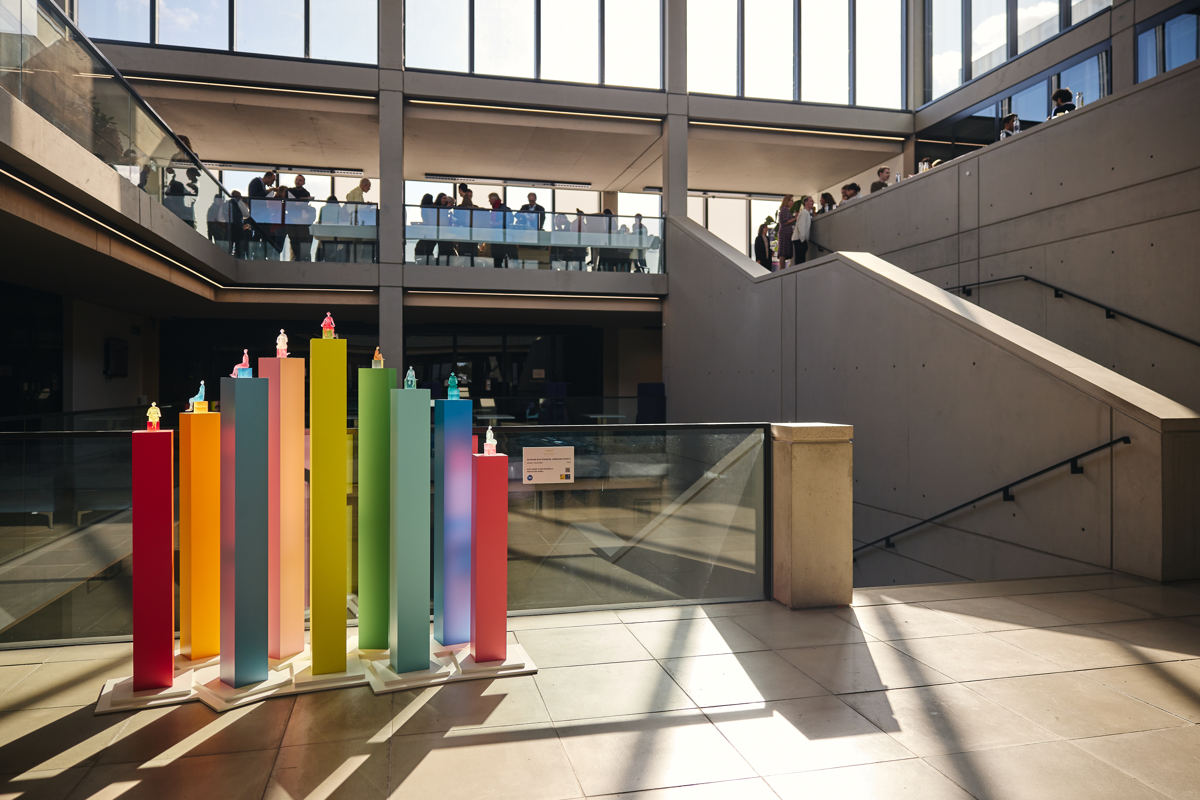
Wendy’s considered use of colour within this sculpture is key – the delicious desirability of the translucent shades of the figures are reminiscent of boiled sweets, evoking happy childhood memories. Everyone loves boiled sweets, everyone is unique and everyone is beautiful.
The selected complementary colour hues do not carry any specific symbolic, social or gendered meanings. Instead, they aim to embrace all ideologies and beliefs that are also reflected in the Department of Economics logo suggesting themes of equality, diversity, and inclusion.
The carefully considered composition of the sculpture also echoes the ethos of The Department of Economics commitment to inclusion – the figures linking to one another by their positioning within the group – not turning their backs to anyone looking in, allowing the viewer to feel included, like they too could join the seated group.
PROJECT SPONSORS

Grapheme-color synesthesia or coloured grapheme synesthesia is a form of synesthesia in which an individual’s perception of numerals and letters is associated with the experience of colours. Like all forms of synesthesia, Grapheme-color synesthesia is involuntary, consistent, and memorable.
It is on this basies I have created and experimented with my own colour alphabet.
Using the colour key on the other side of this sheet you will be able to decipher hidden words in my coloured series.
 Figurative female with her arms up
designed to catch water for the birds
Very pleased with this recently installed commission, so I thought I would share the experience and processes (in summary).
Working closely with a client and garden designer Mary Bullock, I created a smaller scale model (often referred to as a maquette) for client comment/approval.
Once approved, a carefully replicated full size version of the model was created in a material similar to polystyrene and wax – This figure was then signed off by the client and declared ‘ready for casting’.
Having completed the casting process, a considerable amount of time was spent finishing and achieving the desired patina. Back on site – A special base had been prepared to take her ‘now’, quite considerable weight.
Install was a relatively painless and relaxed affair but did involve two installers from the foundry and a number of ‘volunteer’ husbands drafted in as additional muscle. As I said earlier she is exceptionally heavy.
Now firmly in place – she will only improve with time.
If you wish to discuss a similar project or just an idea, please get in touch.
Lost-wax casting (also called “investment casting“, “precision casting”, or cire perdue in French) is the process by which a duplicate metal sculpture (often silver, gold, brass or bronze) is castfrom an original wax sculpture in my case.
The process is quite long winded, here how wikipedia explain it!
Casts can be made of the wax model itself, the direct method, or of a wax copy of a model that need not be of wax, the indirect method. These are the steps for the indirect process:
- Model-making. An artist or mould-maker creates an original model from wax, clay, or another material. Wax and oil-based clay are often preferred because these materials retain their softness.
- Mouldmaking. A mould is made of the original model or sculpture. The rigid outer moulds contain the softer inner mould, which is the exact negative of the original model. Inner moulds are usually made of latex, polyurethane rubber or silicone, which is supported by the outer mould. The outer mould can be made from plaster, but can also be made of fiberglass or other materials. Most moulds are made of at least two pieces, and a shim with keys is placed between the parts during construction so that the mould can be put back together accurately. If there are long, thin pieces extending out of the model, they are often cut off of the original and moulded separately. Sometimes many moulds are needed to recreate the original model, especially for large models.
- Wax. Once the mould is finished, molten wax is poured into it and swished around until an even coating, usually about 1⁄8 inch (3 mm) thick, covers the inner surface of the mould. This is repeated until the desired thickness is reached. Another method is to fill the entire mould with molten wax and let it cool until a desired thickness has set on the surface of the mould. After this the rest of the wax is poured out again, the mould is turned upside down and the wax layer is left to cool and harden. With this method it is more difficult to control the overall thickness of the wax layer.
- Removal of wax. This hollow wax copy of the original model is removed from the mould. The model-maker may reuse the mould to make multiple copies, limited only by the durability of the mould.
- Chasing. Each hollow wax copy is then “chased”: a heated metal tool is used to rub out the marks that show the parting line or flashing where the pieces of the mould came together. The wax is dressed to hide any imperfections. The wax now looks like the finished piece. Wax pieces that were moulded separately can now be heated and attached; foundries often use registration marks to indicate exactly where they go.
- Spruing. The wax copy is sprued with a treelike structure of wax that will eventually provide paths for the molten casting material to flow and for air to escape. The carefully planned spruing usually begins at the top with a wax “cup,” which is attached by wax cylinders to various points on the wax copy. The spruing does not have to be hollow, as it will be melted out later in the process.
- Slurry. A sprued wax copy is dipped into a mixture of plaster of paris. This creates a hard shell. This shell is allowed to dry,
- Burnout. The plaster shell-coated piece is placed cup-down in a kiln, whose heat hardens the silica coatings into a shell, and the wax melts and runs out. The melted wax can be recovered and reused, although it is often simply burned up. Now all that remains of the original artwork is the negative space formerly occupied by the wax, inside the hardened ceramic shell. The feeder, vent tubes and cup are also now hollow.
- Testing. The plaster shell is allowed to cool, then is tested to see if water will flow freely through the feeder and vent tubes. Cracks or leaks can be patched with thick refractory paste. To test the thickness, holes can be drilled into the shell, then patched.
- Pouring. The shell is reheated in the kiln to harden the patches and remove all traces of moisture, then placed cup-upwards into a tub filled with sand. Metal is melted in a crucible in a furnace, then poured carefully into the shell. The shell has to be hot because otherwise the temperature difference would shatter it. The filled shells are then allowed to cool.
- Release. The shell is hammered, releasing the rough casting. The sprues, which are also faithfully recreated in metal, are cut off, the material to be reused in another casting.
- Metal-chasing. Just as the wax copies were chased, the casting is worked until the telltale signs of the casting process are removed, so that the casting now looks like the original model. Pits left by air bubbles in the casting and the stubs of the spruing are filed down and polished
